Friday, June 18, 2010

Installing Google Command-Line Tool for Linux

Ever wanted to upload a folder full of photos to Picasa from a command prompt?' Google introduced today a new project, Google CL, that lets you do that and much more. It's a new command line tool for Linux that acts as an interface with Google services; you can upload videos to YouTube or maybe post a new blog post in Blogger in just one line


Installing Google CL:

DEPENDENCIES

GoogleCL requires Python 2.5 or 2.6 and the gdata python client library. You can get the library from the project homepage: http://code.google.com/p/gdata-python-client/

1. Download gdata-2.0.10.tar.gz or .zip
2. extract the source tar zxvf gdata-2.0.10.tar.gz
3. cd gdata-2.0.10
4. Run sudo ./setup.py install

I got this error...

/usr/lib/python2.6/distutils/dist.py:266: UserWarning: Unknown distribution option: 'install_requires'
warnings.warn(msg)
running install
error: invalid Python installation: unable to open /usr/lib/python2.6/config/Makefile (No such file or directory)

In case of above error install python-setuptools-devel which will also install python-devel as dependency,

sudo yum install python-setuptools-devel

and do the step (4) again

Running Tests and Samples

./tests/run_data_tests.py

If this script runs correctly, you should see output on the command line like this:

Running all tests in module gdata_test
.....................
----------------------------------------------------------------------
Ran 21 tests in 0.028s

OK

Running all tests in module atom_test
...............................................
----------------------------------------------------------------------
Ran 47 tests in 0.038s

OK

....

Finally get the Google CL source from http://code.google.com/p/googlecl/

1. Extract the source
tar xvf googlecl-0.9.5.tar.gz

2. change to googlecl-0.9.5 directory and run
sudo python setup.py install

Now you are ready to play with Google CL and starting posting blogs, videos to youtube etc right from your Linux command Line,

One first run for every google service you will get ...

Did not find config / preferences file at /home/myhome/.googlecl/config
... making new one.
Please specify user: myusername
(Hint: You can automatically launch your browser by adding "auth_browser = " to your config file under the GENERAL section, or define the BROWSER environment variable.)
Please log in and/or grant access via your browser at https://www.google.com/accounts/OAuthAuthorizeToken?oauth_token=4%2FglE62XHHpOLmP6jhGGZumt6Tm2re then hit enter.


Specify the username and put the following in the ~/yourhome/.googlecl/config GENERAL section.

auth_browser = firefox

And when browser open Auth Token page click "Grant Acces"

Examples:

1. Post a blog
$ google blogger post --tags "GoogleCL, awesome" --title "Test Post" "I'm posting from the command line"

2. To post a blog from .txt file

$ google blogger post ~/Desktop/googlecl.txt

3. To delete a post
google blogger delete --title "Test Post"
Are you SURE you want to delete post "Test Post"? (y/N): y

For detail examples refer to GooglCL project web

Friday, June 11, 2010

Installing Nagios-plugins and NRPE on Centos 5.x

To monitor remote hosts CPU load, disk partitions, processes etc with Nagios, requires to install NRPE and nagios-plugins on the remote host.

This is how I do it...

Nagios-plugins and NRPE is not available from Centos official repositories, so first of all we need to configure RPMforge> repo from where to install the required packages.

Read my previous article before configuring and installing anything from third party repo.

Installing RPMforge on Centos 5.x

Download the rpmforge-release package. Choose one of the two links below, selecting to match your host's architecture. If you are unsure of which one to use you can check your architecture with the command uname -i

x386
wget http://packages.sw.be/rpmforge-release/rpmforge-release-0.5.1-1.el5.rf.i386.rpm

x86_64
wget http://packages.sw.be/rpmforge-release/rpmforge-release-0.5.1-1.el5.rf.x86_64.rpm

Install the RPMForget key

rpm --import http://dag.wieers.com/rpm/packages/RPM-GPG-KEY.dag.txt

If key didn't install no worries yum will ask when installing a package from rpmforge repo.

Verify the package you have downloaded
# rpm -K rpmforge-release-0.5.1-1.el5.rf.*.rpm

Install the package
# rpm -ivh rpmforge-release-0.5.1-1.el5.rf.*.rpm

Now everything is setup now you can install nagios-plugins and nrpe packages from RPMforge repo

# yum install nagios-plugins nagios-nrpe

Running NRPE under xinetd

Edit /etc/xinetd.d/nrpe for

disable         = no
only_from       = 127.0.0.1 NagiosServerIP

Restart xinetd service

# /etc/init.d/xinetd restart

Before using third party repositories on Centos

Before configuring and installing anything from third party repo, it is recommended to make sure to use Priorities by installing yum-priorities package for your version of Centos

CentOS-4 or CentOS-6:
# yum install yum-plugin-priorities

CentOS-5:
# yum install yum-priorities

After the plugin is installed, make sure that it is enabled when you decide to use a given archive. You can do this by editing the /etc/yum/pluginconf.d/priorities.conf file, and ensuring that it contains the following lines:

[main]
enabled=1
check_obsoletes=1

Set the priorities of Repositories

With the plugin enabled, you may add priorities to repositories by adding the line:

priority=N

where N is an integer from 1 to 99. The default priority for repositories is 99. The repositories with the lowest numerical priority number have the highest priority. Usually, it is best to give at least the CentOS base and update repositories a very high priority.

Give CentOS base,update,addons,extras repositories the highest possible priority (1):

vi /etc/yum.repos.d/CentOS-Base.repo
priority=1

And give centosplus, and contrib priority 2
priority=2

Give low priority = 10 to all the third party repositories by setting repos files in /etc/yum.conf.d directory

For detail refer to the Centos wiki

Thursday, June 10, 2010

Upgrading to Fedora 13 with Preupgrade

Preupgrade is an application users run on a existing release, that resolves and downloads packages required to upgrade to a newer release of Fedora. While Preupgrade downloads the necessary packages, users are free to continue using their systems. This gives an experience similar to a live upgrade. For additional information

While preupgrade provides a generally hassle free upgrade experience. The following steps are recommended before proceeding.

   1. Backup - Before performing any system maintenance, it is recommended that you back up all important data before proceeding.
   2. Update - Apply available updates Fedora updates before proceeding. As the root user, issue the following command.

# yum update

2. If preupgrade package not already install then install it.

# yum install preupgrade

Perform the upgrade

1. As the root user, run the command preupgrade to start the Preupgrade application. If you prefer a command line application, the command preupgrade-cli is available.

2. On the Choose desired release screen, select the Fedora release (in my case my home laptop running Fedora 12, I have only one option ie Fedora 13) you want to upgrade to , and click the Apply button.

# preupgrade -cli

Checking for new repos for mirrors
 * preupgrade-updates: mirror.yandex.ru
Downloading 947.6MB
Available disk space for /var/cache/yum/preupgrade: 2.8GB


relax and do your work while packages being downloaded which will take quit sometime, depending on your Internet connection.

3. When all of the packages have downloaded, reboot your system to start the Fedora installer and upgrade to the next release.


Common post-upgrade tasks.

Refer to the Fedora wiki

Troubleshooting

Not enough space in /boot

Fedora 13 and above has a 500 MB default boot partition. The default /boot filesystem size of 200MB for previous releases can be a problem for users upgrading from that release.

Follow the instructions on Fedora wiki to handle the space problem on /boot partition.

Note: If preupgrade give you message "Not enough space in /boot/upgrade to download install.img." but it can download it after reboot if you have a wired connection to the network, you can click continue for that.


VLC not working after upgrade to Fedora 13.

Fix: If you are getting the invalid pointer error, try running VLC the first time with:

MALLOC_CHECK_=1 vlc

After setting my preferences and quitting, I was then able to run it normally on F13 without issue.

VirtualBox: Networking between Linux Host and Windows XP Guest

In this article we will learn how to configure networking between Linux host OS and Windows Guest (VM) using Virtualbox

1. First of all download and install Virtualbox on your Linux host and install the guest operating system

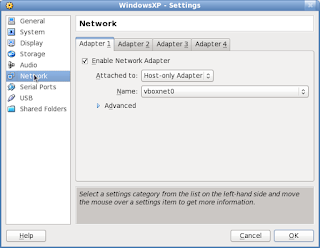
2. Now configure network on Guest OS, open VM settings and click Network

3. Select Host-Only Adapter from "Attached to" combo


The VM will create the default network interface named by "vboxnet0" on the host OS,

#ifconfig
vboxnet0  Link encap:Ethernet  HWaddr 0A:00:27:00:00:00 
          inet addr:192.168.56.1  Bcast:192.168.56.255  Mask:255.255.255.0
          UP BROADCAST RUNNING MULTICAST  MTU:1500  Metric:1
          RX packets:0 errors:0 dropped:0 overruns:0 frame:0
          TX packets:3599 errors:0 dropped:0 overruns:0 carrier:0
          collisions:0 txqueuelen:1000
          RX bytes:0 (0.0 b)  TX bytes:3896747 (3.7 MiB)

VirtualBox automatically assigned IP address 192.168.56.1 on the host to that network interface.

4. Launch the XP guest OS from virtualbox and configured the network upon VM successfully boot

 5. Make sure both Host and guest can responding to each other 'ping'
ping 192.168.56.10
PING 192.168.56.10 (192.168.56.10) 56(84) bytes of data.
64 bytes from 192.168.56.10: icmp_seq=1 ttl=128 time=1.83 ms
64 bytes from 192.168.56.10: icmp_seq=2 ttl=128 time=0.512 ms

Enabling Internet for VM.

Above steps was fine as far as networking between Host and VM is concerned, however if you want to let VM also access the Internet then you have to configure the following iptables rules and enable ipfowarding on Host OS.

# insert NAT rule
iptables -t nat -A POSTROUTING -o vboxnet0 -j MASQUERADE
iptables -t nat -A POSTROUTING -o eth0 -j MASQUERADE

# enable forwarding
echo 1 > /proc/sys/net/ipv4/ip_forward

Saturday, June 5, 2010

CountDown to 2010 FIFA World Cup South Africa

I wonders who will miss this amazing event :), I wish I could watch all the matches of this great event.

Italy will be defending its title which they  won  in the 2006 FWC in Germany against France.

Like all previous Football world cup Brazil will again my favourite team, Brazil is the only team which have qualified for all known FWC and also holding a record of wining FWC 5 times.